Friday, December 23, 2011

A little tree and fresh greens

I remember a time when you couldn't walk into your neighborhood Home Depot and pick up bunches of good looking evergreens and boxwood branches.  I would have to hunt them down at a nursery or find them in the woods. 


After popping into the Depot here and there for one more bunch of greens I would admire those cute live tabletop trees.  Have you seen them?  Well, the other day they were half off so for ten dollars I grabbed one up not knowing exactly where I would put it.


This is how he looked after spraying on some snow and giving him a good trim.  Mr. 65th asked me why I bought such an ugly little tree. 


When he saw it in the morning he had to admit that he was surprised it turned out so nice.  I used garage sale ornaments that I have been holding on to and hot glued a pine cone for a tree topper. 


The natural theme of the little tree fit nicely with the woodland mantel.  If you have been reading along for a while you might remember our faux mantel looking just like this last year.  I loved it too much to change it and will keep it through the winter....except for the Merry Christmas sign.


Pinecones are one of my favorite accessories, they go with everything don't they?


I finally found a spot for these faux birch branches...they have been moving all over the house until I tried them here in the living room.  I always thought that corner needed a little something.  I bought them last year at a nursery that was going out of business. They will stay out after Christmas too. 


I am off to watch a Christmas movie and wrap the rest of the presents.  Our traditional Christmas Eve lasagna is made and the house is clean.  Let the countdown to Christmas morning begin!


 Wishing you and your family a very Merry Christmas!

Friday, December 16, 2011

Christmas 2011

The sun finally came out today so I was able to take a few hundred pictures, but don't worry, I won't show you all the bad ones.  There are a few things I want to finish around the house before the big day gets here but for the most part we are ready.

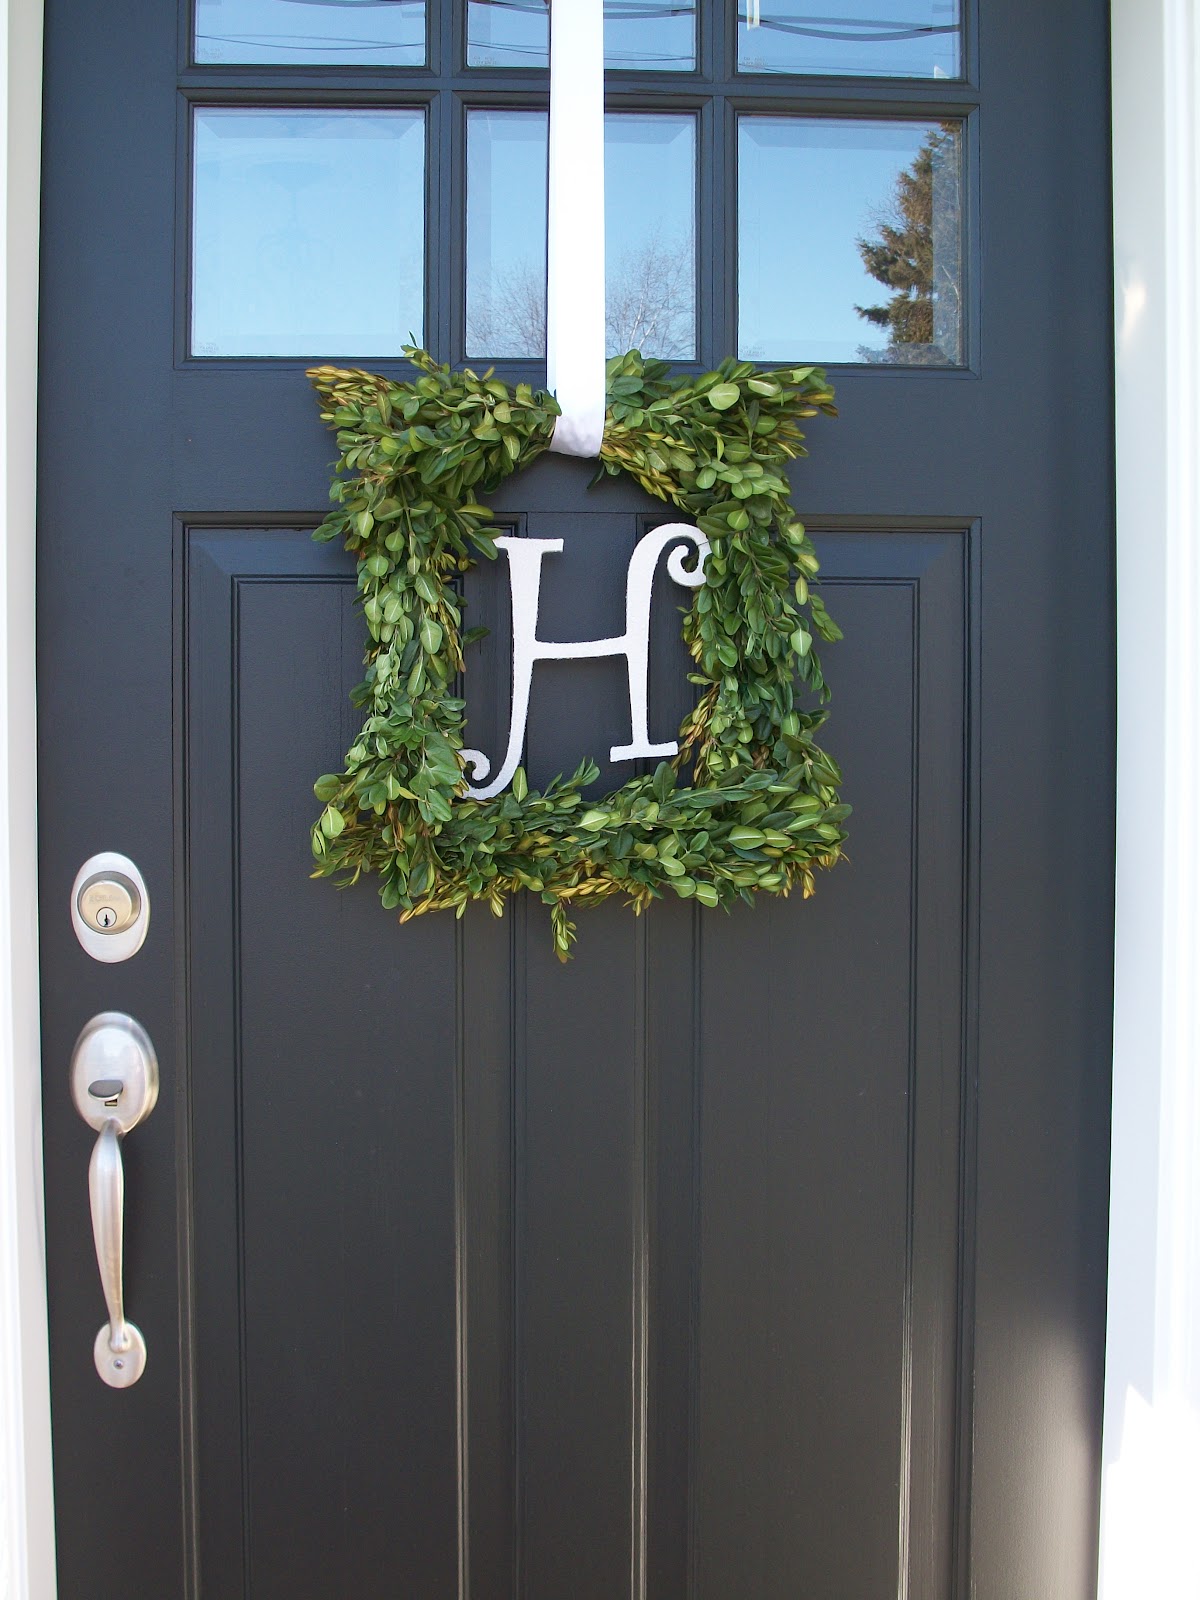
I really wanted to find a wreath for the front door this year and when I couldn't find what I was looking for I decided to make my own. 


Now a wreath hanging on a front door might not be a big deal to some people, but this is our first one so I am really excited!  I never thought to hang one there before because of the storm door.


I used a boxwood wreath tutorial from Rene who blogs at Cottage and Vine but instead of using a wreath form I used a wooden picture frame.  The letter got the same sparkle treatment as my pinecones did last year.  To see how I sparkled click here.


So did a bunch of little snowflakes that I found at Michaels.


It was still warm out when I started thinking about hanging snowflakes and icicles from the trellis that wasn't even built yet.  I had quite the display going on the day after Thanksgiving...snowflakes in various sizes were hung just right until the winds came. 

(That fake garland doesn't cut it anymore since the remodel

There were a few nights that I was woken up by them banging on the house and windows.  Everything was a tangled mess and I felt a little silly, I think I forgot how bad the weather can be here. 


So today I went out and took all the little flakes down and moved some of the bigger ones around so they won't hit the house. That is the plan anyway. 


Let's head inside for a bit...


I don't change things around very much year to year.  Like our ornaments for example, I have been collecting them for a long time so they always stay the same. 


The tree on the other hand is always different since we search for the perfect one and cut it down.  This year the tree is huge and is one of the meanest trees we have ever had!  Every ornament was painful to put on, it wouldn't stay straight and it's dropping needles already.  Oh, and I can't forget about the baby spiders that hatched thinking it was spring time.


I changed the top of the antique dresser from last year.  I have to admit that I was putting the Santa and sleigh up there like I have in the past until I needed a spot for my mason jar snow globes.  I fell in love with them just like so many did....they are so cute and fun to put together. 


I was inspired by Michelle who blogs at Vintage Junky to put a little Christmas tree in the back of the little ones toy truck.  This one comes from the Land of Nod but if you want the real deal Michelle sells them in her etsy shoppe.


Let's head into the kitchen to see what Mr. 65th drew up for us on the chalkboard.


I found this image while searching for inspiration.  I knew I wanted something old fashioned and this Victorian Christmas tree fit the bill.  (I never say "fit the bill" in real life but it just kind of came out....do you ever write something that you wouldn't normally say?) 


Since we are off the subject for a minute...are some of these pictures too big?  I don't resize them before I upload and I usually use the large size for most pictures.


Let's continue with the extra large pictures and carry on.  Here is another view of the living room.


Dollar store trees and more toys borrowed from the little one are hanging out under the cloche.  I scraped off a handfull of styrofoam to create staticy snow for under the glass to give it a "snow globe" effect.  I found the styrofoam idea on pinterest here.


That concludes our tour for now, thanks so much for stopping by!  


I am joining The Nester for her 2011 Christmas tour of homes and Rene @ Cottage and Vine. 


Sunday, December 11, 2011

a birch vase

I dropped one of my favorite vases the other day and a piece broke right off the top.  It's still usable but didn't look so great anymore so I thought I would give it a little makeover.  We have a large River Birch tree with lots of peeling bark that I have been wanting to do something with.


After using some hot glue and adding fresh evergreens and boxwood I have a whole new look that took less than five minutes.  I love a good quick project like this. 


If you don't have a birch tree of your own you can find bark covered containers for a great price here and here.  I'll be back in a few days to share some of our holiday decorating. 

Tuesday, November 15, 2011

Craftsman style cottage

Finally, I am here with before and after pictures of the house.  There were so many times I wished you all were here standing in the front yard with me when I had to make quick decisions.


Like when the day came to build the portico over the door.  How high should it be?  How wide?  I wasn't exactly sure. 


The Moravian light hanging in the portico was my first choice but Mr. 65th wasn't so sure about it.  We ended up ordering it when our flush mount light wasn't going to fit since the roof is curved.  Funny that neither one of us thought about that.  Mr. 65th likes the star pendant now that it's up.


The days leading up to building the trellis for the front of the house had me freaking out a bit.  How big should it be?  Will there be too many brackets on our little house?  (There are seven)  Will it all come together the way I envisioned it or will I hate it?  So many questions and uncertainty even though there was a plan in place.  I even chickened out for a day or two and told our contractor to just build the trellis over the garage door instead.


Our plan didn't include exact measurements of everything, we were just kind of winging it.  Taking inspiration from a variety of different places and seeing how things would fit together as we went.  You can see my inspiration here.


I'm glad I went for it.  I think it adds the dimension the house so badly needed and helps to balance the uncovered porch.

Here is a picture of a picture right after we bought our house and took all the metal awnings down.
Remember the story about us almost driving away when we first saw our house?  Now you know what I was talking about right?   And why would someone put a section of vertical siding on the front of the house and make it a different color so it would stand out even more? 


Here is a picture years later after adding some trim around the door and windows, building a new porch, changing the landscape and replacing the door and storm door.  Oh, and I painted the vertical siding to match the rest of the house.


And here we are today.  I'm calling it a craftsman style cottage.  What do you think?  Does it say that to you?  The soffits were extended and two new windows are in place of the lonely one above.  We still need to finish a few things like changing out a piece of lattice that doesn't match because it used to be covered by bushes.  And the guys need to come back to fix a few pieces of siding by the portico brackets...but that's another story. 


Another before....


You can see by the landscape that we have been planning this for a long time.  Everything was just starting to grow in when I took these before pictures.  Now everything is already on its way out for the season.


I'm thinking three black rocking chairs will be a nice addition to the porch next year.


Did you notice we are going storm door-less?  I made our contractor promise he would come back in January to hang it if we are freezing our butts off.  I hope we can make it without.  Now I just need to figure out which mailbox to order and what to do about house numbers. 

For anyone looking for paint colors, the exterior is Crownsville Gray HC-106 by Benjamin Moore and the siding is cement board by Nichiha.  I remember how helpful it was to see different colors on actual houses when I was looking.

Monday, October 31, 2011

Halloween porch

Hello dear readers.  I wanted to pop in and share a few pictures I took this morning after sprucing up the porch.


It's quiet around here again and we have our driveway back since the house is officially done.  Well, except for a few touch ups here and there but that shouldn't be a big deal.  I planned on posting as the house renovations progressed but that just didn't happen. 


So I'm giving you a little peek of the house today with more pictures on the way.


I found the mouse silhouettes at Michaels...gotta love that Martha Stewart. 


I'm off to get our Monarch butterfly ready for some trick or treating.  Happy Halloween!

***Update*** To see the finished exterior makeover click here.

Tuesday, October 18, 2011

Two windows a portico and soffits

So much has been going on with the exterior remodel, just not enough time to post.  For starters, the non existent soffit on the front of the house has been extended.  At first we talked about building them out to twenty four inches but I changed my mind and went with eighteen, the back of the house will be the same. The side soffits hung out at about five inches, now they are twelve. 


The old shingles were removed after the roof extensions were framed...that way the shingles will all match.  Our roof was almost twenty years old so we were going to need a new one soon anyway.  And looky there...my little portico was starting to take shape.


A reminder of what the roofline looked like before.  Also, take note of that single window sitting all by himself.


I have been talking about adding another window to the front of the house for so long.  So when the day finally came we were ready.  Our house was built in the forties so we made sure to take precautions for lead paint.  If you have ever cut through plaster walls, you know what I'm talking about when I say it's going to be a huge dusty mess.


Now let me tell you about the mistake.  See the new windows in the picture above?  Well, right after it was installed something didn't feel quite right.  I couldn't put my finger on it but I wasn't as thrilled as I thought I would be.  When Mr. 65th got home he knew right away that we needed two separate windows instead of one unit. 


Remember this horrible picture of the living room windows?  Two separate windows.


Well now we have matching windows....two separate matching windows.  Much better. 

I have to say that being on the job and having to make quick decisions here and there without another opinion has been tough.  Especially when I had to be a big girl and tell our guy that he had to rip out the window he just put in.  Not fun.


I have a big crush on porticos and brackets, so you can only imagine how excited I am to share this picture.  If I was on pinterest...which I really need to be...you would be able to see all the portico and bracket inspiration I dug up.

Oh, and here is a sneak peek of the siding color.  Remember how crazy I was trying to pick a color?  Well I am happy to say...I love it. 

Until next time.
 

Site design by FABULOUS K CREATIVE