Wednesday, March 21, 2012

Upholstered headboard

Our tiny master bedroom is finally getting some much needed attention.  I think people tend to go one of two ways when it comes to decorating their personal space.  Either it's first to be finished so a sanctuary is created right off the bat or it's put on the back burner until other projects and rooms are complete.  Our room has always been on the back burner, until now.


We started out with a tall four poster traditional headboard and footboard that overwhelmed our small room.  But that wasn't the only reason we sold it on Craigslist.  Change was needed for a long time, like almost three years long. 


See that crazy bump out by the ceiling in the picture above?  Well, after we installed hardwood floors and were ready to put our bed back together it wouldn't fit.  The new floors were thicker than carpet and raised the bed just enough so the post on the north wall wouldn't fit!  We put the bed back together but didn't add the second half of the posts, it looked ridiculous and it was time for a change.  


I knew I wanted an upholstered headboard without a footboard for added visual space.  I started looking around for one but couldn't pull the trigger knowing we could make one ourselves for a fraction of the cost.  That's when I started doing a little DIY research and found a wonderful video tutorial done by Grace at Design Sponge.


Here is our new headboard taking shape....


Ready for the fun part, fabric! I went with linen.


I cannot take credit for getting the headboard done, it was just my design.  Mr. 65th started it and just kept on going until it was finished.  I told him what shape I wanted and picked up the fabric, batting and two inch foam.  After buying the foam and fabric on sale (the most expensive part of the project), we spent $120 for a queen size.  You can't beat that price!


The prints above the bed are actually pages from a book I talked about once before...Insects of Surinam by Maria Sibylla Merian. The tall and slender nightstands are antiques that were once part of a vanity. They were already separate when we found them years ago at a garage sale. We stripped, sanded and stained them back to life.


I want to thank Emily A. Clark for including me in her fun series called "Send Me A Picture"  Emily asked me and a group of bloggers to submit a picture for this month's topic and of course I said yes! This was the little push I needed to finally get these frames hung, they have been sitting in my closet for over a month!   Stop over and check it out.

Emily A. Clark

Sunday, March 11, 2012

A little before and after

We had a very exciting visitor stop by recently.  Actually she snuck in while everyone was asleep and took one of the little ones baby teeth. 


Here is the before, one of the very last pictures I have of my girl with all her baby teeth somewhat intact. 


The first tooth came out when we were in the car and a week later the other one fell out while hiking in the woods. I think she will always remember that story. 


As I was sewing her little tooth pillow I was hoping she would like it.  You see, I don't sew.  Ever.  But this was a special occasion and we had a tooth coming out any day!  I was thrilled when she declared her love for her new pillow.  It kind of looks like a five year old made it, but it was made with love.


That toothless smile just melts my heart!  This wonderful little person will be turning six in a couple weeks.  She has requested a "Butterfly Birthday Party".  I think I can handle that. 

Speaking of birthdays, I got a supercalifragilisticexpialidocious early birthday present yesterday.  My birthday is three days earlier than the little one. 


She emptied her piggy bank to get mommy the camera she wanted.  She and Mr. 65th gave it to me early so I can learn how to use it before her party.  I love early presents!


I took this picture last night while playing around...now I just need to figure out how to blur the background like that again and I will be making progress. 

Tuesday, February 28, 2012

Come on spring!

After passing a few awful sicknesses back and forth we are ready for spring more than ever!  Today was chilly but the sun was shining and the birds were chirping...so it's coming.  This past weekend I put the remainder of the "winter" decorations away and made room for a couple new springy plants.


A trip to a nursery that has a greenhouse can quickly chase away the winter blues.


 I couldn't find the pot I was looking for so I wrapped the plastic one this fern came in with some left over linen fabric.  I used my hot glue gun to make a little slipcover.


I guess I have a thing for ferns since I have three fern prints hanging above the couch.  That reminds me....I need to plant a few more this spring.  I like to clip the stems and use them in flower arrangements or pop them in a little vase by themselves.

My next springy find was this pussy willow tree.  I saw it way on the other side of the greenhouse and was drawn to it. 


It reminds me of forcing branches to bloom but it's actually alive and growing.  We don't have the space for this tree to be planted so I will use it as a plant, maybe bringing it outside in the summer.


Soon all the trees and shrubs will look like this.  For those of you who have flowers blooming already, I am jealous.  Come on spring!

Friday, January 20, 2012

Misted Fern

Hello and happy 2012!  We were just about to get back into the swing of things after enjoying a fun filled winter break when the sickness came, first the little one, then me.  We are finally feeling better but this cough doesn't want to leave us alone.

I don't have anything new to share with you but I do have some pictures of a dresser I made over a while back.  Do you remember the silhouette plate I made in the fall?  Well here it is hanging in our little hallway with a few other plates I picked up here and there.


This dresser acts as our linen closet overflow, mostly holding sheets, pillow cases and table cloths.  It made its way here when the guest room became the nursery.  It's old and the drawers don't work all that great for a kid's room, it's one of those two handed opener and closers.

This is how she looked when I found her in a little shop years ago.


It definitely needed some color, something fun so it didn't blend in with the walls anymore.  Misted fern by Benjamin Moore to the rescue.


Sample pots come in handy for all kinds of projects, especially since someone removed the feet from this dresser.  Suggestions are welcome to get this girl back on her feet, I'm kind of stumped.


I thought I would end up buying new hardware or painting the existing ones but after trying a couple on I really liked it as is.


Dressers are wonderful for extra storage in any room of your house.  In my dream home I would have one in the entry too.  You could even use one as a buffet in the dining room, or use one in the kitchen or the living room...ok...I'm getting a little crazy here so I'm off to bed early again tonight, I'm still trying to get caught up on my sleep.  Have a wonderful weekend!

I'm sharing with Miss Mustard Seed at her Furniture Feature Friday party. 


Friday, December 23, 2011

A little tree and fresh greens

I remember a time when you couldn't walk into your neighborhood Home Depot and pick up bunches of good looking evergreens and boxwood branches.  I would have to hunt them down at a nursery or find them in the woods. 


After popping into the Depot here and there for one more bunch of greens I would admire those cute live tabletop trees.  Have you seen them?  Well, the other day they were half off so for ten dollars I grabbed one up not knowing exactly where I would put it.


This is how he looked after spraying on some snow and giving him a good trim.  Mr. 65th asked me why I bought such an ugly little tree. 


When he saw it in the morning he had to admit that he was surprised it turned out so nice.  I used garage sale ornaments that I have been holding on to and hot glued a pine cone for a tree topper. 


The natural theme of the little tree fit nicely with the woodland mantel.  If you have been reading along for a while you might remember our faux mantel looking just like this last year.  I loved it too much to change it and will keep it through the winter....except for the Merry Christmas sign.


Pinecones are one of my favorite accessories, they go with everything don't they?


I finally found a spot for these faux birch branches...they have been moving all over the house until I tried them here in the living room.  I always thought that corner needed a little something.  I bought them last year at a nursery that was going out of business. They will stay out after Christmas too. 


I am off to watch a Christmas movie and wrap the rest of the presents.  Our traditional Christmas Eve lasagna is made and the house is clean.  Let the countdown to Christmas morning begin!


 Wishing you and your family a very Merry Christmas!

Friday, December 16, 2011

Christmas 2011

The sun finally came out today so I was able to take a few hundred pictures, but don't worry, I won't show you all the bad ones.  There are a few things I want to finish around the house before the big day gets here but for the most part we are ready.

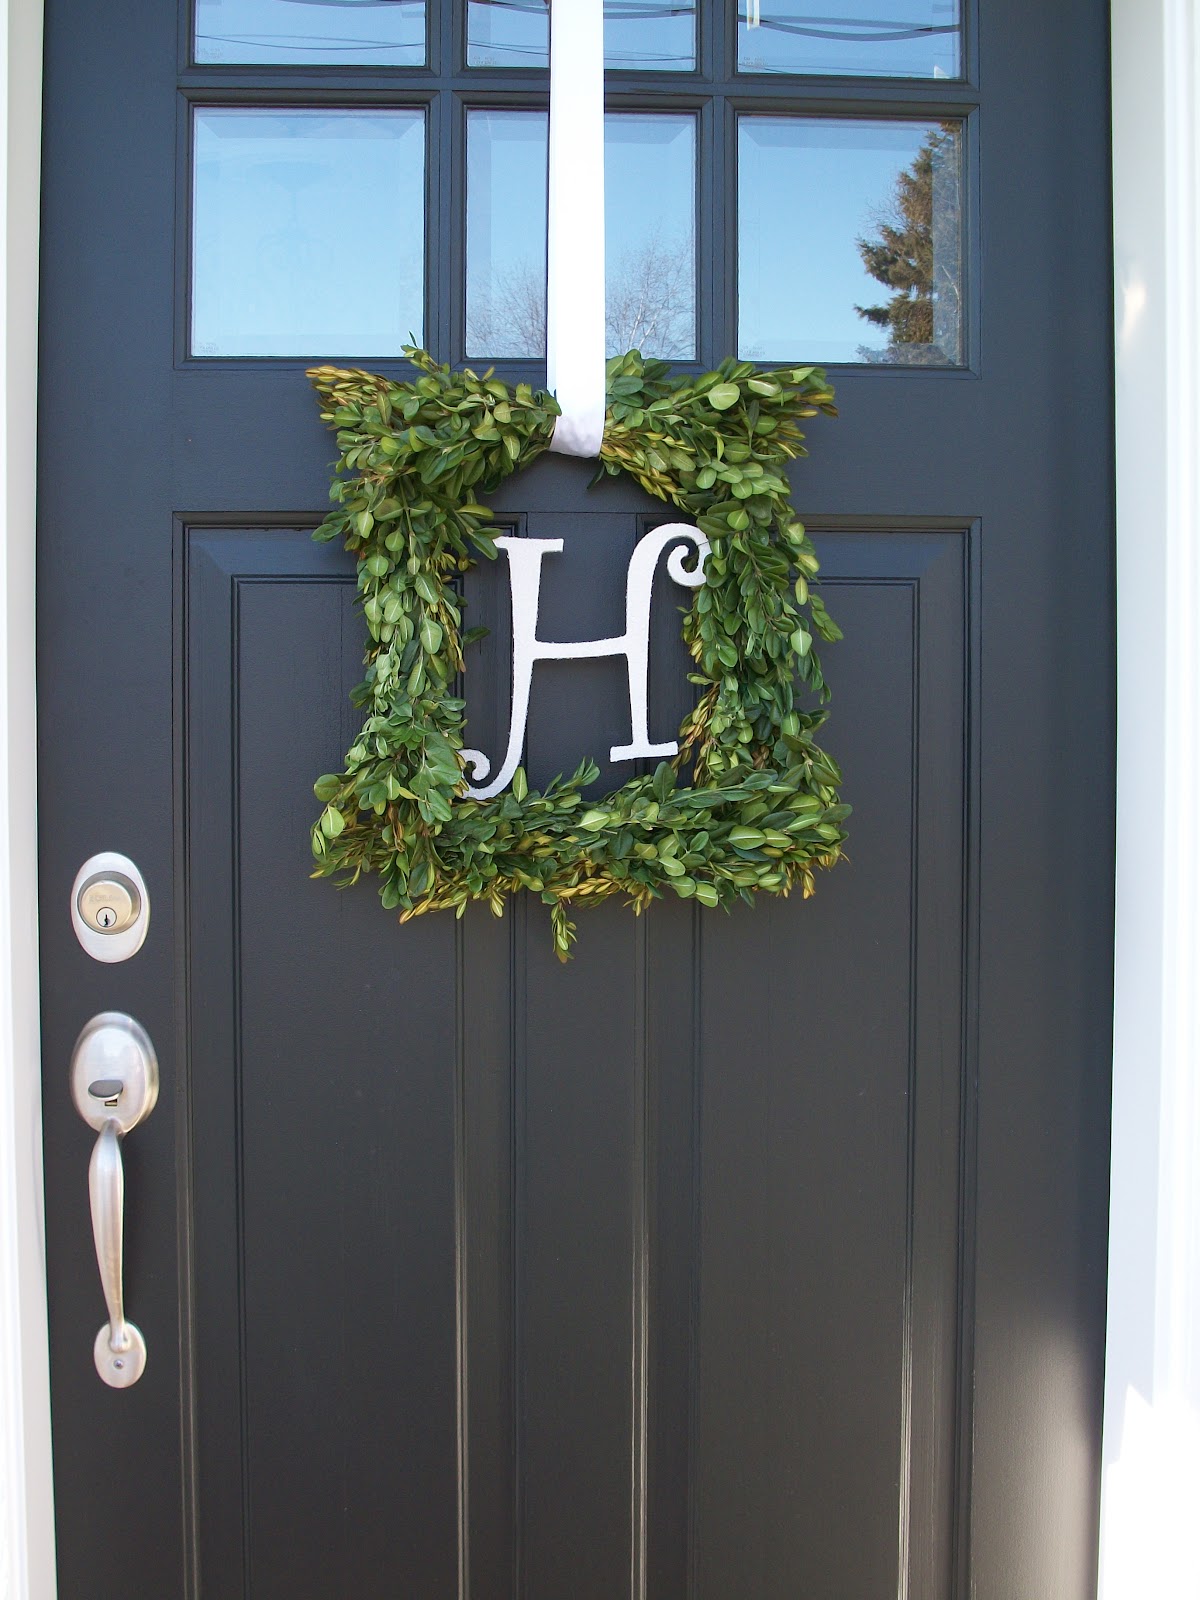
I really wanted to find a wreath for the front door this year and when I couldn't find what I was looking for I decided to make my own. 


Now a wreath hanging on a front door might not be a big deal to some people, but this is our first one so I am really excited!  I never thought to hang one there before because of the storm door.


I used a boxwood wreath tutorial from Rene who blogs at Cottage and Vine but instead of using a wreath form I used a wooden picture frame.  The letter got the same sparkle treatment as my pinecones did last year.  To see how I sparkled click here.


So did a bunch of little snowflakes that I found at Michaels.


It was still warm out when I started thinking about hanging snowflakes and icicles from the trellis that wasn't even built yet.  I had quite the display going on the day after Thanksgiving...snowflakes in various sizes were hung just right until the winds came. 

(That fake garland doesn't cut it anymore since the remodel

There were a few nights that I was woken up by them banging on the house and windows.  Everything was a tangled mess and I felt a little silly, I think I forgot how bad the weather can be here. 


So today I went out and took all the little flakes down and moved some of the bigger ones around so they won't hit the house. That is the plan anyway. 


Let's head inside for a bit...


I don't change things around very much year to year.  Like our ornaments for example, I have been collecting them for a long time so they always stay the same. 


The tree on the other hand is always different since we search for the perfect one and cut it down.  This year the tree is huge and is one of the meanest trees we have ever had!  Every ornament was painful to put on, it wouldn't stay straight and it's dropping needles already.  Oh, and I can't forget about the baby spiders that hatched thinking it was spring time.


I changed the top of the antique dresser from last year.  I have to admit that I was putting the Santa and sleigh up there like I have in the past until I needed a spot for my mason jar snow globes.  I fell in love with them just like so many did....they are so cute and fun to put together. 


I was inspired by Michelle who blogs at Vintage Junky to put a little Christmas tree in the back of the little ones toy truck.  This one comes from the Land of Nod but if you want the real deal Michelle sells them in her etsy shoppe.


Let's head into the kitchen to see what Mr. 65th drew up for us on the chalkboard.


I found this image while searching for inspiration.  I knew I wanted something old fashioned and this Victorian Christmas tree fit the bill.  (I never say "fit the bill" in real life but it just kind of came out....do you ever write something that you wouldn't normally say?) 


Since we are off the subject for a minute...are some of these pictures too big?  I don't resize them before I upload and I usually use the large size for most pictures.


Let's continue with the extra large pictures and carry on.  Here is another view of the living room.


Dollar store trees and more toys borrowed from the little one are hanging out under the cloche.  I scraped off a handfull of styrofoam to create staticy snow for under the glass to give it a "snow globe" effect.  I found the styrofoam idea on pinterest here.


That concludes our tour for now, thanks so much for stopping by!  


I am joining The Nester for her 2011 Christmas tour of homes and Rene @ Cottage and Vine. 


Sunday, December 11, 2011

a birch vase

I dropped one of my favorite vases the other day and a piece broke right off the top.  It's still usable but didn't look so great anymore so I thought I would give it a little makeover.  We have a large River Birch tree with lots of peeling bark that I have been wanting to do something with.


After using some hot glue and adding fresh evergreens and boxwood I have a whole new look that took less than five minutes.  I love a good quick project like this. 


If you don't have a birch tree of your own you can find bark covered containers for a great price here and here.  I'll be back in a few days to share some of our holiday decorating. 


Site design by FABULOUS K CREATIVE