Tuesday, June 7, 2011

Exterior paint color

I have finally decided on a color for the house. This was such a hard decision. It was making me crazy...and not only me....sorry friends and family.


The paint with the circle around it is the color we chose...Crownsville Gray by Benjamin Moore. Below and to the left is Devonshire Green by BM and to the right is Master Room by Ralph Lauren. Here is how I narrowed it down this weekend.

I thought I had to choose a color from the small paint deck the contractor gave me since the siding will come pre-painted. After finding out I wasn't limited and could use any paint color or brand, my options grew. I should have asked before I bought all those paint samples....none of the colors really appealed to me.


Devonshire Green by Benjamin Moore

We went to see a new construction house that our contractor just finished. The siding we are using has a cedar texture and we wanted to see it on a house. When we pulled up I was happy to see a color I liked. The owner gave us the name and I was off to the paint store....again. Knowing all along that it was probably to dark for our small house, but it was worth a try.


The color on top is Devonshire Green and the bottom color is Meadow Trail by Sherwin Williams....a bit too green.

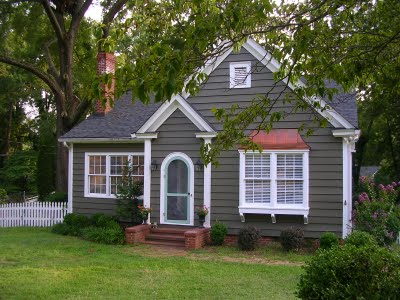
Another inspiration was this adorable cottage that I've had in my favorite's folder since we started making plans for our house. I love the color and the copper above the window is my favorite. I was sure this was going to be it.

Paint color...Master Room by Ralph Lauren

 
When I got the RL sample up I was surprised that it was almost identical to Devonshire Green. The struggle for me is this color looks great on both style houses but it is so dark. I couldn't pull the trigger.

Master Room by RL is on the right next to Crownsville Gray.
Am I convinced this is the right color? No. I don't think I will be until I see it on the whole house. At least now I can focus on something other than paint!

We have a couple things to do before we hurry up and wait...I will fill you in as we go.
If you missed it, you can read about the plans here.

Wednesday, June 1, 2011

The Exterior Makeover Plan

It is an exciting time here at Sixty-Fifth Avenue. The exterior of our house if finally getting some much needed attention. Right now the house has faded vinyl siding and a facade that is lacking dimension. Until I share pictures with you just imagine a triangle house that a five year old would draw.

The plan is to have cement board siding installed and a portico built over the front door. A trellis will go over the front porch to add more dimension since it's not covered. Adding a covered porch is not in the budget.

My first hurdle is choosing a paint color for the siding. This has become my new obsession. I mean, this will be the color we will have to live with for the next fifteen years. (Cement board siding holds paint longer than wood.)


And what if I choose the wrong one? I've done it plenty of times for the interior of the house...at least that is only a fifty dollar mistake that can be fixed.

My mountain of samples.

I'm leaning towards earthy colors. Here is Renwick Olive by Sherwin Williams on the back of the house. The side of the house looks like a quilt with all the samples painted on.


I have another greenish color drying on the other side of this door as I type. I can't wait to see how it dries.

Here are my inspiration pictures...


I love everything about this portico. The Impatient Gardener


The soffits will be extended with the addition of brackets for a craftsman cottage look.

Country Living

Trellis and portico together.


Our trellis and trim will be white like this one.


I need to get the paint colors over to the contractor quick since it will take about three weeks to come in. I've already spent a week trying to decide. Wish me luck!

Friday, May 27, 2011

Friday I'm in love

Hello and happy Friday! If your house doesn't have a doorbell like mine, this adorable door knocker just might be the next best thing. I was looking through some of my old Cottage Living magazines when I found this favorite.

Designed by Michael Healy

It may not be very practical but it would be fun to fill with a few flowers or greenery from the garden.

I'm posting from our netbook since my regular computer with all the pictures stored on it has another virus. I seem to picking one up every other day lately! Mr. 65th is working on getting it up and running so I will post pictures of the fairy gardens next week. Have a wonderful long weekend!

Sunday, May 22, 2011

Fairy Garden Party

Do you believe in fairies?  We believe....so this weekend we invited a few friends over to create a special garden of their own...one the fairies will be sure to love.


Mr. 65th added to the chalkboard wall for the occasion. He found a fairy online, printed it out and blew it up on a copy machine. The he taped all the pages together and cut it out to use as a stencil. (he really is as wonderful as he seems)

Everyone gathered up their plants, containers and adorable accessories before coming over. We took some time to ooh and aah over each others finds before digging in.


I'm not sure who was more excited.....us or the little girls.

The potting table we put together last year came out of winter hibernation. I gave the legs a quick coat of grey paint since the varnish I used yellowed the white paint last summer.


Then I grabbed a few things I had around the house....crystal candlesticks for a little sparkle and a mirror that used to hang in the dining room.


I bought the mason jars for about a buck a piece and added colorful twisty straws. The drink dispenser is from Pottery Barn....I can't wait to fill it with margaritas this summer. Chalkboard labels are such a quick and easy project, you can read about them here.


 The butterfly cookies are from a local bakery.


Estate sale chairs and a table saved from the landfill are perfect for an outdoor party. Now I just need to find a few more chairs.


The girls decorated wings and were all giggles flying around the yard together. It was a wonderful day.


The fairy garden pictures can be seen here.


Visit thecsiproject.com

Monday, May 16, 2011

Little Lime hydrangeas

It's starting to warm up here in the Midwest....well it was Hot the other day and yesterday was darn right chilly, but spring is definitely here. When the leaves open and the spring flowers are blooming I get excited about getting back into the garden.


This year is all about hydrangeas. I am determined to have them blooming along the porch like this...

BHG

Aren't they the perfect cottage flower? Last year I tried a couple different varieties in the front yard with no luck, they needed so much water and still wilted in the sun. I transplanted them to go on either side of the playhouse since there is some shade from the redbud tree.

After doing a little research I found a brand new shrub called Little Lime hydrangea. They are the dwarf form of the popular Limelight hydrangea.


They will grow to be three to five feet tall and wide and will fit into a small space like mine.


They are drought tolerant, can handle full sun and are the perfect cut Flower.

 
 I planted three along the porch and can't wait for them to cover this area with blooms.


 So far so good....I will keep you posted when they bloom this summer. Fingers crossed!

Saturday, May 7, 2011

Mother's Day bouquets

Putting flowers together into pretty bouquets is one of my favorite things to do. Giving them away is even more fun so I whipped up a couple bouquets for Mother's Day.


Cherry blossoms and tulips are the main flowers in these arrangements. 


For this one I used a salsa jar as a vase because it reminded me of a mason jar. I would call that good recycling.


I found this vase at TJ Maxx for less than five dollars. Always a good deal to be had there!

Oh, and if a certain Mom is reading this that I won't be seeing until next week, don't be sad, I have a little something special for you too.

Happy Mother's Day!


Wednesday, May 4, 2011

Spring chalkboard wall

We are having fun drawing on the chalkboard wall as the seasons change. For spring I bought a few of those felt Easter decorations at the dollar store and used them as a stencil. It worked really well.

 
Looking into the living room from the kitchen. You can see our Christmas wall here.

On another note, we are excited to start putting together our fairy garden. The little one is really into fairies this year so I'm thinking the dinosaurs won't be invited this time.


Will you be creating one this year?

Sunday, May 1, 2011

Hello!

Everything at home is back to normal and I am ready to be back. (Sorry for the lack of details.) I knew it was time when I started thinking to myself in blog post form. Am I the only one who does that?

Do you remember the hallway project we started way back when? Well it's almost finished, I just have to paint a hard to reach wall. The stairs are finished so I thought I would give you a look and a proper "Hello" since I've been gone for so long.


I will share more once I get back on the ladder that has to balance precariously on the basement stairs.


http://cottageandvine.blogspot.com/  Sharing this project with Rene @ Cottage and Vine.

Wednesday, March 16, 2011

A needed break

Hello dear readers,

My full attention is needed at home for a bit so I will be taking a little blogging break. The hallway project is coming along nicely, now I just need to find the time and focus to paint all the beadboard and trim. I will be sure to share some good before and afters with you when I get back.

Talk to you soon!

Londen

Friday, March 11, 2011

Have you tried forcing yet?

A couple weeks ago I cut a few branches from a magnolia tree and now we have blooms!


Forcing branches is really easy to do. After you bring your branches of choice inside, get your container ready and fill with cool water.


Give them another clean cut and create a slit in the cut end of your branches about three inches long to make sure they take in enough water.


Depending on how close they are to their natural bloom time will determine how long it might take for them to bloom. I cut mine early so I had to wait a while.


This is what they looked like when I first brought them in.


The last thing you need to do is change the water every few days and enjoy. I hope you have a fabulous weekend, spring is on its way!

Monday, March 7, 2011

making progress

Ok, Mr. 65th was right....installing beadboard in the hallway is a time consuming project. And if you add a little one to the mix it goes a bit slower...ok a lot slower, especially since using a nail gun after her bedtime might not be a good idea. But that's ok.


You can't tell by the picture, but we did make some good progress this weekend, nowhere near done, but progress. Three more pieces of beadboard to hang then we can start on the trim and I can do more painting. As you can see, I already painted the top half of the room...that was scary. I had to be on a ladder with two legs sitting on a step and the other two legs hanging out into space...not very fun.

I'm off to look at paint swatches for the downstairs door. Talk to you soon!

P.S. Thank you to everyone who helped me talk Mr. 65th into getting on board with this project! xo

Thursday, March 3, 2011

Hallway decisions

If you are a regular reader you might know that projects tend to go pretty slow around here. Especially when I can't make up my mind about paint colors. Or if I have to convince a certain someone to help me with a project that would require more time and money. I happen to think our ugly back hallway is worth it.


When we moved in, it was sponge painted green and white. It was very busy and outdated so I painted it brown hoping the dark walls would hide the fingerprints and dirt. Now I'm craving something bright and fresh to welcome us home.

The last couple of days have gone a little something like this....

Me...Hey honey, look at these pictures...I love all these mudrooms with white beadboard and board and batten. I think it would really freshen up the hallway. What do you think?

Mr. 65th...I don't think it's worth it, we don't spend a lot of time in there.

Me...True, but it is the first space we walk into when we come home.

Mr. 65th...It would be such a pain because of all the angle cuts that we...or should I say I would need to make. Just paint it like we planned...is it really worth all the extra time?

Me....I think it is. Plus, this would be a great place to try it out.

As of right now, I'm still not sure what we're going to do with the walls. I do know we want to check this project off our list this weekend.


Here is a little peek at the stair project I'm working on. I hope this is one of those projects that turns out the way I envision it. We will see.
 

Site design by FABULOUS K CREATIVE